Read over your rubrics
(self-evaluation) for this task before you complete the activities. Click on
the arrow and use the BACK button on your browser to return to this page and
continue. 
Before you begin this task, be sure to practice
the skills you learned in Part I. Click on the arrow to go over Part I.
In
this task, you'll use more tools. You'll add a slide to your presentation and
delete that slide.
You'll also enter graphics to slides.
Open
the presentation you saved in Part I as "yourinitialspp1.ppt."
[Remember that you can go back and forth between this page
and your presentation. Just press the ALT key and click the TAB key on your
keyboard.]
ACTIVITY I 
Let's add an image, or
graphic, to you presentation title page. Right-click on
the graphic below.
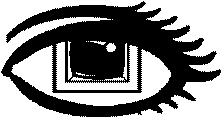
A
list of options will come up. Select "SAVE PICTURE AS."
When the SAVE box comes up, save the image to your desktop or into your
folder.
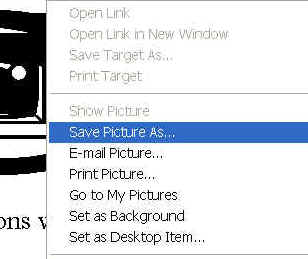
Remember
where you saved it so that you can copy it into your presentation. The name of
the image should be "title.gif" because
it will be the image in your title page.
Go
to your PP presentation's title page. On your Menu Bar, Select INSERT ->
PICTURE -> From File
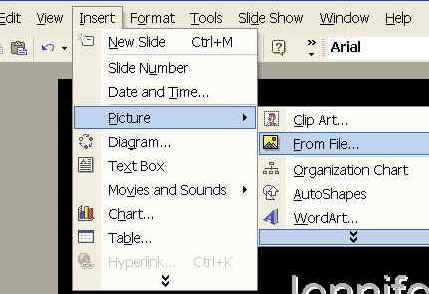
When
the image appears, hold down the left mouse button on the picture and drag it
between the Title and Subtitle of the slide. (You can drag images anywhere on the
slide.)

When you click on the picture,
you'll notice that small dots appear on the sides. Those are called "HANDLES."
You can make the picture bigger or smaller or you can change its proportions. If
you drag the left and right handles your picture will be wider or narrower. Top
and bottom handles make it taller or shorter. If you want to keep the
proportions of the picture, use the handles on each corner. Drag the mouse
toward the middle.
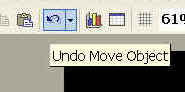
Play
with different sizes for your image. You can always undo your actions by
clicking on the UNDO icon or pressing CONTROL
Z on your keyboard.
 SAVE your presentation.
Below
are a few more icons that you'll see on your main toolbar. Try each one
out. As long as you don't save your presentation as you play with the icons, you
can always go back to your original slide (CONTROL+Z or
the UNDO button). You can always close the
presentation and open it again. It will open to the slides you save the last
time.
 New
New |
Create a new presentation (Also
Control+N) |
 Open
Open |
Open an existing presentation
(Also Control+O) |
|
Save |
Save the presentation (Also
Control+S) |
 Print
Print |
Print the current presentation
(Also Control+P) |
 Spelling
 |
Spell check the presentation
(Also F7) |
 Copy
Copy |
Copy selected text (Also
Control+C) |
 Paste
Paste |
Paste cut or copied text (Also
Control+V) |
 Undo
Undo |
Undo the last action (Also
Control+Z) |
 New Slide
 |
Add a new slide to the
presentation (Also Control+M) |
 Zoom
Zoom |
Change the zoom percentage |
 Microsoft PowerPoint Help
 |
Access the Office Assistant
(Also F1) |
 More Buttons
 |
See additional toolbar buttons |
ACTIVITY II
You should see a DRAWING
Toolbar like the one below. It helps you change the colors of shapes and
text, add arrows, and more.

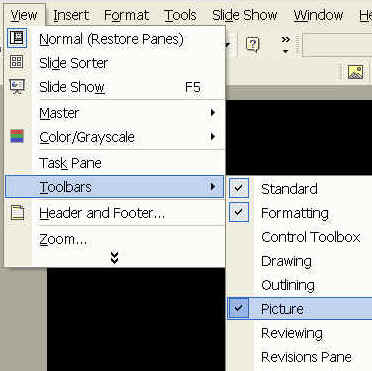
If
you don't see the Drawing toolbar when you click an image, open it from VIEW on
your menu bar.
Open
a new slide and select the BLANK Slide
Layout. (You learned that earlier.)
Click
on AUTO SHAPES on the toolbar. Notice all of the
choices you have!
Draw different shapes, add text,
and change play with different icons . We'll delete that slide later.
For
example, select a triangle from the shapes in that toolbar and draw it on the
slide by dragging the cursor.
You can fill the shape with colors (Paint Bucket), color the borders (Paint Brush) and
increase the size of the borders (Stacked lines). Choose the 3-dimension
icon and give it a shadow. To see each change, the object MUST be selected.
If you see a little green circle
above the shape, you can drag that around and rotate the shape.
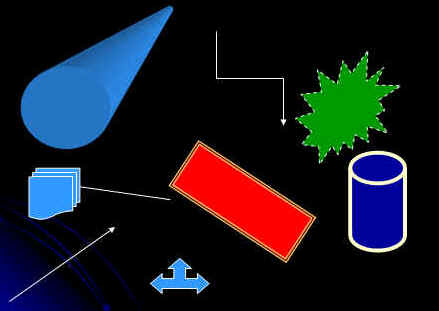
Below is an example of a slide with different
shapes.
Now,
instead of saving this "play" file, let's delete it from your
presentation.
Step
1: Look at the icons on the left and bottom part of you screen. 
The five buttons
give you the different view modes you can use while
you work. The buttons and related view modes are:
 Normal View
 Outline View
 Slide View
 Slide Sorter View
 Slide Show
Step 2:
Select the
Slide Sorter View
Step 3:
When the slides appear in order, click on the slide that shows the shapes you
made.
Step 4:
Press the delete button on your keyboard, and it's gone! If you made a mistake,
remember what to do? (Hint: the icon has a curved arrow...). The Undo button!
Or... CONTROL+Z several times, until you get back to where you started.
Now SAVE your presentation.
GO
TO READING/WRITING ACTIVITY
GO
TO MATH ACTIVITY
Complete
the Rubrics, print and date the Rubrics page, and place it in your folder.
Congratulations!
You've learned something new today!!!